Boston Cream Pie
This post may contain affiliate links, and I earn from qualifying purchases. Please read our privacy policy.
Sharing the best recipe for Boston Cream Pie, which is really a cake, that originated at the Parker House Hotel in Boston in 1856.

October 23rd is National Boston Cream Pie Day! I recommend you start your day treating yourself to a Boston Cream Doughnut, and then go home and bake a Boston Cream Pie!
Share the Boston Cream Pie love on social media today using the hashtags #NationalBostonCreamPieDay, #BostonCreamPieDay and #RecipesForHolidays.
Be sure to follow my October Food Holidays page so you never miss a food holiday in the month of October!
“I used to love Danish. My father used to make a Boston Cream Pie. You never see that anymore.”
-Christopher Walken
The History of Boston Cream Pie:
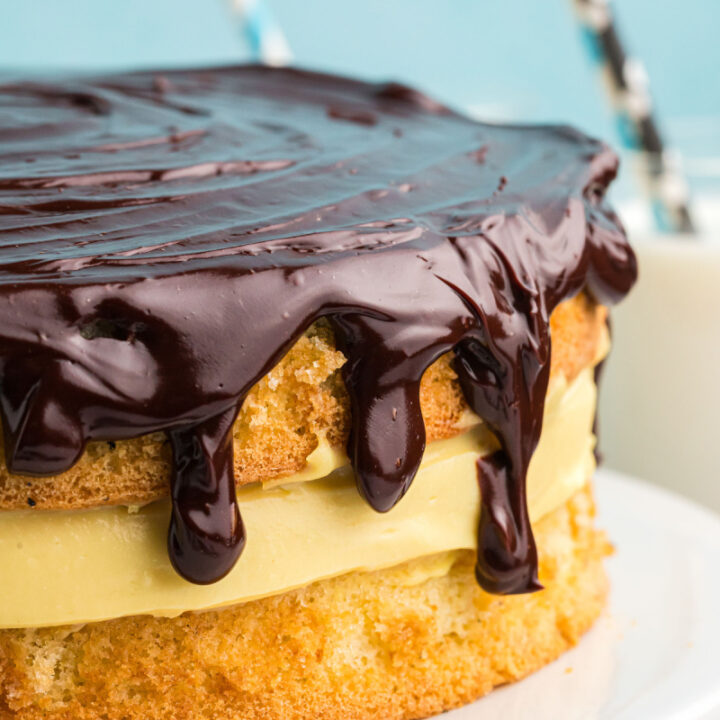
A Boston cream pie consists of two layers of sponge cake filled with a thick custard and topped with a chocolate glaze. The original version included a brush of rum syrup and the addition of toasted sliced almonds.
The dessert got its name from a time when cakes and pies were baked in the same pans.
It is said that Chef Mossburg Sanzian of the Parker House Hotel in Boston created the recipe for Boston cream pie in 1856. The chocolate on the dessert was what made it so popular. We have no idea why the chef named it as a pie when it is clearly a cake.
A recipe was published in 1887’s Miss Parloa’s Kitchen Companion. That recipe is similar to what we know today as the Boston cream pie.

Ingredients needed:
- half and half cream and heavy cream
- egg yolks and whole eggs
- granulated white sugar
- baking powder and salt
- all purpose flour
- unsalted butter
- vanilla extract
- whole milk
- light corn syrup
- bittersweet chocolate

How to make Boston Cream Pie:
The complete, printable recipe is at the end of this post.
- MAKE THE PASTRY CREAM:
In a medium saucepan over medium-heat, heat the half and half until just simmering. Meanwhile, whisk the egg yolks, sugar and salt together in a bowl until smooth. Whisk in the flour. Whisk about 1/2 cup of the half and half into the yolk mixture to temper, then slowly whisk the tempered yolk mixture back into the remaining half and half in the saucepan. Continue to cook, whisking constantly, until the mixture thickens slightly, about 1 minute. Reduce the heat to medium-low and continue to simmer, whisking constantly, for 8 minutes. - Increase the heat to medium and cook, whisking vigorously, until bubbles burst on the surface, 1 to 2 minutes. Off heat, whisk in the butter and vanilla until incorporated. Strain the pastry cream through a fine-mesh strainer set over a medium bowl. Press plastic wrap directly on the surface. Refrigerate the pastry cream until set, at least 2 hours (and up to 24 hours).
- BAKE THE CAKE:
Adjust an oven rack to the middle position and preheat the oven to 325 degrees F. Spray two 9-inch round pans with nonstick spray, then line the bottoms of the pans with parchment paper and spray them again. - In a bowl, whisk together the flour, baking powder and salt. In a small saucepan over low heat, combine the milk and butter and heat until the butter is melted. Remove from heat, add the vanilla, and cover to keep warm.
- Using a stand mixer fitted with a whisk attachment, whip the eggs and sugar on high speed until light and airy, about 5 minutes. Add the hot milk mixture and whisk by hand until incorporated. Add the flour mixture and whisk by hand until incorporated.
- Divide the batter evenly between the prepared pans. Bake until the tops of the cakes are light brown and a toothpick inserted into the center comes out clean (20 to 22 minutes). Let the cakes cool completely in pans on a wire rack for about 2 hours. Run a thin knife around the edges of the pans, remove the cakes from the pans, discarding the parchment, and let cool completely on the rack.
- Place one cake layer on a platter. Whisk the pastry cream briefly, then spoon onto the center of the cake. Using an offset spatula, spread the cream evenly to the edge. Place the second layer on top of the pastry cream, bottom-side-up, and press lightly on the cake to level. Refrigerate the cake while you prepare the glaze.
- PREPARE THE GLAZE:
In a small saucepan over medium-heat, bring the cream and corn syrup to a simmer. Remove from heat, add the chocolate, and let it sit, covered, for 5 minutes. Whisk the mixture gently until smooth. - Pour the glaze onto the center of the cake. Using an offset spatula, spread the glaze to the edge of the cake

Let the excess chocolate drip down the sides!
Storage:
Refrigerate the cake for at least 3 hours before serving. The cake can be refrigerated up to 24 hours before serving time. Store leftovers in the refrigerator too.

Why I Love This Recipe:
- It’s a classic recipe! Who doesn’t love a classic recipe that has been around more than 100 years. I’d love to go to the Parker House Hotel in Boston and try a slice of Boston Cream Pie there!
- The cream in the middle is completely decadent and amazing.
- I love that this is a “naked cake.” No need to cover the whole cake with chocolate glaze. It’s fun to see the layers.
- I love a Boston Cream Doughnut, and the cake is pretty amazing too.

Fun Facts about Boston Cream Pie:
- The Boston Cream Pie is the official dessert of Massachusetts.
- Created from the pie is the Boston Cream Doughnut.
- The world’s largest Boston cream pie was created in 2010 by culinary students at Southern New Hampshire University. It was 10-feet wide, 1 1/2-feet high and it weighed over one ton.
- At one time, the Boston cream pie (cake) was referred to as a “cream pie.”
- All of these years later, the Omni Parker House Hotel is still serving up the original version of the Boston Cream Pie on their menu.
Boston Cream Pie
The pie that is really a cake!
Ingredients
PASTRY CREAM:
- 2 cups half and half cream
- 6 large egg yolks, at room temperature
- 1/2 cup granulated white sugar
- pinch of salt
- 1/4 cup all purpose flour
- 4 tablespoons unsalted butter, cut into 4 pieces and chilled
- 1 1/2 teaspoons vanilla extract
CAKE:
- 1 1/2 cups all purpose flour
- 1 1/2 teaspoons baking powder
- 3/4 teaspoon salt
- 3/4 cup whole milk
- 6 tablespoons unsalted butter
- 1 1/2 teaspoons vanilla extract
- 3 large eggs, at room temperature
- 1 1/2 cups granulated white sugar
GLAZE:
- 1/2 cup heavy cream
- 2 tablespoons light corn syrup
- 4 ounces bittersweet chocolate, chopped finely
Instructions
- MAKE THE PASTRY CREAM:
In a medium saucepan over medium-heat, heat the half and half until just simmering. Meanwhile, whisk the egg yolks, sugar and salt together in a bowl until smooth. Whisk in the flour. Whisk about 1/2 cup of the half and half into the yolk mixture to temper, then slowly whisk the tempered yolk mixture back into the remaining half and half in the saucepan. Continue to cook, whisking constantly, until the mixture thickens slightly, about 1 minute. Reduce the heat to medium-low and continue to simmer, whisking constantly, for 8 minutes. - Increase the heat to medium and cook, whisking vigorously, until bubbles burst on the surface, 1 to 2 minutes. Off heat, whisk in the butter and vanilla until incorporated. Strain the pastry cream through a fine-mesh strainer set over a medium bowl. Press plastic wrap directly on the surface. Refrigerate the pastry cream until set, at least 2 hours (and up to 24 hours).
- BAKE THE CAKE:
Adjust an oven rack to the middle position and preheat the oven to 325 degrees F. Spray two 9-inch round pans with nonstick spray, then line the bottoms of the pans with parchment paper and spray them again. - In a bowl, whisk together the flour, baking powder and salt. In a small saucepan over low heat, combine the milk and butter and heat until the butter is melted. Remove from heat, add the vanilla, and cover to keep warm.
- Using a stand mixer fitted with a whisk attachment, whip the eggs and sugar on high speed until light and airy, about 5 minutes. Add the hot milk mixture and whisk by hand until incorporated. Add the flour mixture and whisk by hand until incorporated.
- Divide the batter evenly between the prepared pans. Bake until the tops of the cakes are light brown and a toothpick inserted into the center comes out clean (20 to 22 minutes). Let the cakes cool completely in pans on a wire rack for about 2 hours. Run a thin knife around the edges of the pans, remove the cakes from the pans, discarding the parchment, and let cool completely on the rack.
- Place one cake layer on a platter. Whisk the pastry cream briefly, then spoon onto the center of the cake. Using an offset spatula, spread the cream evenly to the edge. Place the second layer on top of the pastry cream, bottom-side-up, and press lightly on the cake to level. Refrigerate the cake while you prepare the glaze.
- PREPARE THE GLAZE:
In a small saucepan over medium-heat, bring the cream and corn syrup to a simmer. Remove from heat, add the chocolate, and let it sit, covered, for 5 minutes. Whisk the mixture gently until smooth. - Pour the glaze onto the center of the cake. Using an offset spatula, spread the glaze to the edge of the cake, letting the excess drip down the sides. Refrigerate the cake for at least 3 hours before serving. The cake can be refrigerated up to 24 hours before serving time.
Nutrition Information:
Yield: 12 Serving Size: 1 sliceAmount Per Serving: Calories: 505Total Fat: 27gSaturated Fat: 16gTrans Fat: 0gUnsaturated Fat: 10gCholesterol: 207mgSodium: 299mgCarbohydrates: 56gFiber: 2gSugar: 39gProtein: 10g
Nutritional information is estimated using a nutrition calculator. It's not likely to be 100% accurate.


Or make a yellow boxed cake mix, layer vanilla pudding, coat with melted chocolate. Yours would taste sooo much better, though!
thank you so much for this recipe. I learned to make this many years ago and have only been able to find the “shortcuts” Vanilla pudding is NOT custard cream